Sunday, November 16, 2008

King Arthur's Pie Crust

-->
This is a wonderfully tasty and flaky pie crust that I've used for years. It rarely falls apart on me, transfers easily, and holds up great. You can use this for a Pot-Pie crust as well, just make it a bit thicker and double the recipe. I found this in a King Arthur Flour Company catalog years ago, saw it in a demonstration during one of their cooking schools, and loved it.
Apple Pie
Medium- or Short-Flake

A
medium-flake crust can be used for main-course dishes or, by adding the optional sugar, for sweet fillings or even tart shells. Our recipe makes enough for a double-crust 9-inch pie. You can easily substitute whole wheat pastry flour for an equal amount of your unbleached white.

Start with about 1/2 cup until you find a ratio you like. Whole wheat pastry flour produces a crust with a "bite" and a hearty flavor, which is great with savory fillings and is a wholesome alternative for sweet fillings, too. I love this recipe. It is simple, doesn’t fall apart, and can be made ahead of time. This is the one I use all the time.

2 cups Unbleached All-Purpose Flour
1/2 to 1 teaspoon salt
2 teaspoons sugar (optional)
1/2 to 3/4 cup shortening, lard or butter (I use unsalted real butter)
4 to 7 tablespoons ice water

In a large bowl, combine the flour, salt and sugar if you're using it. With a pastry blender, two knives, or your fingertips, cut or rub half of the fat into the flour mixture until it resembles cornmeal. Then take the remainder of the fat and cut or rub it in until the largest pieces are the size of a dime, or flattened peas.

Sprinkle the ice water, one tablespoon at a time, over the flour/fat mixture. With a fork, toss the mixture that you've just moistened and push it to one side. Continue until the dough is just moist enough to hold together.

Then gather it into a ball (a bit like gently packing a snowball), cut it in half and flatten the halves into two disks. If you're making a double-crust pie, make the piece for the bottom crust slightly larger, since it has to fit down into the pie plate.

Wrap the two pieces of dough and put them in the refrigerator to give them a rest for 30 minutes or more before rolling them out.

my cherry pie

If you get in a pinch or need to do the pie crust quickly, I've used my food processor and they still turn out okay.  


Net
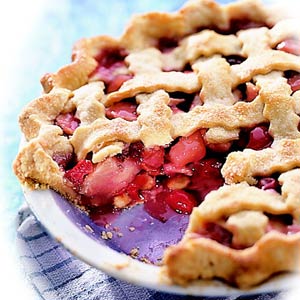
Cherry Pie

Cherry Pie

My family loves a good cherry pie and this is one that I frequently take to gatherings.


Filling:
  • 2 cans of cherry pie filling (I use Comstock, but you can use Lucky Leaf or whatever is available).
  • a toucn of Almond Extract (maybe 1/4-1/2 tsp)
  • Sugar (1/4 c. sugar, more or less)
Okay this is one of those pies that I don't really use a recipe on, but go by taste.

  • Preheat oven to 450º, remove chilled pastry dough from the refrigerator and set aside.

  • Pour the contents of the pie filing in a large bowl, add a bit (maybe 1/4-1/2 tsp.) of almond extract and about 1/4 cup of sugar or less. Taste. Adjust by adding more extract or sugar if you need and taste again. I love this part! If you want the filling to be a bit thicker, you can take some of the filling, add a tablespoon or two of flour or cornstarch. Once it is blended in nicely, add it back into the rest of the pie filling and stir gently until it is uniform (blended in well).

  • Roll out the bottom crust and fit into 9-inch pie plate, trimming to 1 inch beyond the edge. Lay the top crust over the filling, sealing and fluting the edges; cut steam vents in the top. My kids love it when I do a fancy lattice crust. ** Just remember that it needs to be vented so if you just lay a solid crust over it, use a knife to slit a few places, so the steam can escape.
  • Bake 15 minutes, then lower the oven temperature to 350º F and bake 40-50 minutes or until the crust is golden. You might want to put a cookie sheet below your pie in case there is any overflow. This will save you from having to clean your oven.
  • Remove pie from the oven and cool slightly on a wire rack. Serve warm and adda scoop of vanilla ice cream if desired.

Thursday, November 13, 2008

Joanie’s Scalloped Tators

A friend from church gave this to me when I was first married and it has been a hand-down easy favorite! It is so simple to make for 1-however many you need, and is so delicious!!!

  1. Thinly slice 1 medium potato per person. Spray baking dish with Pam or Crisco.
  2. Put 1 layer of potatoes, covering the bottom of the dish and lightly salt and pepper. I don't always peel the potatoes, more vitamins are retained that way.
  3. Lightly cover the potatoes with shredded Colby or Colby Jack cheese.
  4. Thinly slice butter and dot these on the top of the cheese (do not cover the top with butter or it will be greasy. No more than 1-2 tablespoons cut up into small pieces.
  5. Lightly dust the top with flour (like you would a cake pan)
  • Repeat steps 1-4 until you’ve run out of slices or room.
  • On the last layer, top it nicely with cheese, and finish with the butter and dusting of flour. Using 1-2 cups of hot whole milk, pour over layers until milk appears ½ way up on the dish. If you use too much milk, it will be very runny. I usually take a conservative side with this.
  • Sometimes I'll put this in the microwave to cook for 20 minutes if I'm in a hurry. If you do this, please use Plastic Wrap to cover it.
  • Cover with foil and Bake in oven for 40-45 minutes at 350º

Tuesday, November 11, 2008

Cornbread and Chili

With the chill in the air and frost on the lawn, my family begs for those comfy winter dishes that we love. One of those main staples for the winter is Cornbread and Chili. My father-in-law loves my cornbread and chili, and I've been known to made up a huge batch so I can leave some with them. I love it when the family gets excited about something being done in the kitchen.

I must confess that my chili recipe is nothing special. I get a package of 2-Alarm chili (except the red peppers), add a pound of cooked deer or turkey meat, brown a pork chop, cut that into small pieces. throw it in with a couple of cans of tomato sauce (maybe even a can of diced tomatoes), throw in a few cans of pinto beans, a cut up stalk of celery, and a few tablespoons of brown sugar. Let it simmer in the crock pot or in a dutch oven for an hour or two (if you're not in a hurry). Now my husband is originally from Indiana and he loves his chili mixed with elbow macaroni. That makes me think more of something they used to serve us in the cafeteria in school, but I like my chili on a baked potato with lots of cheese!


One of my favorite cookbooks is by Linda Fisher, The Muffin Lady. She does things simply with her hands and with her heart. I love her cornbread recipe - and wanted to share it with you. . Best served on a cold day with butter and jelly (if you're like my hubby).

The Best Yet Sweet Cornbread

4 T. butter
1 T. baking powder
1/4 c. oil
1/4 tsp. salt
2 c. cornmeal
2 eggs
1/2 c. sugar
1 c. milk

  1. Preheat the oven to 350º. Allow 10 minutes for preheating.
  2. Put the butter and oil in a 9 inch square cake pan (Sometimes I make my cornbread in an iron skillet instead of a stone square pan and place in the oven until the butter melts and browns, approximately 10-15 minutes. Make sure the oil/butter coats the sides of the pan/dish you are using, so you have a smooth release.
  3. Combine all dry ingredients, make a well in the center.
  4. Add the eggs and milk, stirring well.
  5. Pour the melted butter and oil on top and stir gently until completely blended.
  6. Pour the batter into the same pan used to melt the butter/oil.
  7. Bake for 20-30 minutes or until light golden brown.
*Yields about 8-10 servings.

Thursday, November 6, 2008

Fried Apples

I remember my Mom making this when I was growing up and so I continued to do this once I got married, but most people around this area have not heard of fried apples. We love to fix them when we have company and are doing a home cooked meal. Most of time we get a reaction of "Um, can you tell me what this is?" Only our former minister's family had ever heard of or fixed them.

This is an easy dish that we serve with our meal and not as a dessert. They will not look like a traditional fried food (hard and crispy on the outside, rather they will be tender when fully cooked.
  1. I like to use a harder type apple (Pink Lady, Rome, Braeburn). Core and slice some apples – about 1-2 for each person that you’re fixing dinner for, into wedges and then cut those in half. You’ll have a bunch of little wedges.
  2. Put some butter (you MUST use REAL butter) in a skillet (I use a non-stick skillet) and melt over medium heat. As the apples are cooking you may need to add some more butter if it looks like you don't have enough - make sure the butter doesn't cook completely out or they will burn.
  3. Add the apples; stir/turn the apples to make sure that all are coated by the butter.
  4. Sauté 15 to 20 minutes or until apples are tender, but not too soft or too brown. If you cook them too long they might become gooey. You will need to turn them from time to time to ensure even cooking. Some people like to add some cinnamon and nutmeg, though I never have.

Wednesday, November 5, 2008

Morning After Party Flourless Chocolate Cake

I was sent this recipe a few years ago, but finally tried it Wednesday when I needed a quick dessert. Claire and I made this together and it turned out pretty good! Not much was left when everyone was done with it. Mine didn't look near as fluffy as the original picture, but that didn't seem to matter in the end.

After-Party Chocolate Cake

8 oz. bittersweet chocolate, chopped
1 1/2 sticks unsalted butter
6 eggs, separated
1/2 c. sugar
confectioners sugar

1. Heat oven to 300 degrees.

2. Butter a 9-inch springform pan and line the side wall with a strip of parchment paper.

3. In the bowl of a double-boiler, combine butter and chopped chocolate. Add water to bottom of pan and place bowl over pan. Melt chocolate over medium heat until smooth. Remove bowl from pan and cool slightly. (I cheated and did mine in the microwave - I don't have a double-boiler.)

4. Beat egg whites with an electric mixture until soft peaks form. Slowly add sugar and beat until glossy and stiff.

5. Whisk egg yolks into chocolate mixture. Whisk in a dollop of egg whites to lighten. Gently fold in the rest of the egg whites with a rubber spatula.

6. Pour batter into prepared pan and bake until cake is set (center may be jiggly), about 40-45 minutes.

7. Cool cake for 20 minutes and remove sides of pan. Continue to cool. Dust with confectioners sugar. This taste great with a little dollop of ice cream or cool whip as well!

This flourless cake has a light, mousse-like texture. Best served warm.

Monday, November 3, 2008

Pizzeria/spaghetti Casserole

3 C. (8oz) cooked pasta
2 C. pizza/spaghetti sauce
2 oz sliced pepperoni or 1 lb of cooked meat (beef, chicken, bison, deer)
1 1/2C (shredded mozzarella cheese)

Cook pasta and drain. In a 2 qt. casserole, combine pasta, sauce, meat and cheese (save a little bit to sprinkle over the
top when done). It's okay to stir and mix this in the casserole dish. Sprinkle with cheese. cover with foil and bake for 25 minutes or until hot and bubbly.

**I love to add in Parmesan, mozz. and other type of cheeses I have on hand. Finishing with mozz. and Parmesan.

If you wanted to, you could add green peppers, garlic, other pizza type yummies. Serve with an Italian flat bread or garlic bread and this is simple and inexpensive meal!